Step-by-Step ECG Acquisition Guide and Nursing Interventions
Step-by-Step ECG Acquisition Guide: Clinical Practice & Nursing Interventions
Learning how to take a 12-lead ecg is a foundational skill in modern nursing. Electrocardiography (ECG/EKG) is a non-invasive, vital diagnostic tool that records the electrical activity of the myocardium over time.
This comprehensive guide reviews the standard 12-lead ECG procedure, medical terminology, and NANDA-I nursing interventions aligned with international clinical standards.
1. Indications and Clinical Preparation on How to Take a 12-Lead ECG
A 12-lead ECG records cardiac repolarization and depolarization cycles from 12 different electrical angles. Primary indications include:
- Chest pain and suspicion of acute coronary syndrome (ACS).
- Arrhythmia management and rhythm monitoring.
- Evaluation of syncope, dizziness, and electrolyte imbalances (particularly Potassium and Calcium levels).
- Monitoring congenital heart diseases and cardiotoxic drug therapies in pediatric patients.
2. Pre-procedural Preparation
The key to high-quality ECG acquisition is optimal patient preparation and signal maximization.
- Patient Identification & Informed Consent: Explain the procedure to the patient to alleviate anxiety and promote cooperation.
- Environmental Factors: Ensure the patient is warm. Shivering induces somatic tremor artifacts on the ECG tracing. Maintain an optimal room temperature.
- Skin Preparation: The skin surface must be clean, dry, and free of oils. Clean the electrode sites with alcohol pads and allow them to air-dry. For excessively hairy chest walls, clipping or shaving the hair (skin prepping) is required to ensure adequate electrode adhesion and electrical conductivity.
3. Electrode Placement & Anatomical Landmarks
”Knowing exactly how to take a 12-lead ecg requires a deep understanding of these specific anatomical positions.”
A standard 12-lead ECG requires 10 electrodes: 6 precordial (chest) and 4 peripheral (limb) electrodes.
Precordial Leads (Chest Leads)
- V1: 4th intercostal space, right sternal border.
- V2: 4th intercostal space, left sternal border.
- V3: Midway between V2 and V4.
- V4: 5th intercostal space, midclavicular line.
- V5: Horizontal to V4, anterior axillary line.
- V6: Horizontal to V4 and V5, midaxillary line.
Limb Leads (Peripheral Leads)
Standard color coding (AHA/IEC standards) must be followed for accurate acquisition:
- RA (Right Arm / Red): Placed on the right wrist or upper extremity.
- LA (Left Arm / Yellow): Placed on the left wrist or upper extremity.
- LL (Left Leg / Green): Placed on the left ankle or lower extremity.
- RL (Right Leg / Black): Placed on the right ankle (Ground electrode).
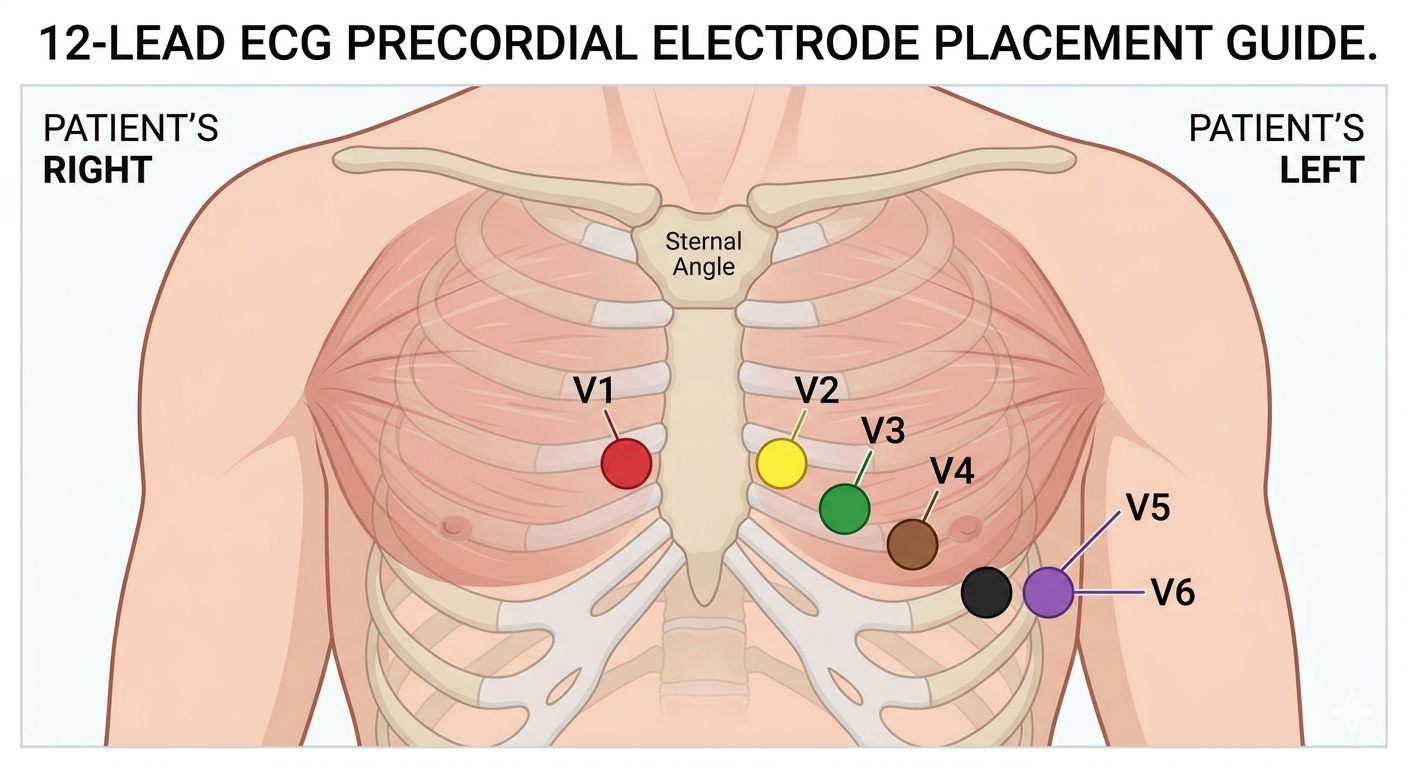
Figure 1: Anatomical Electrode Placement Guide
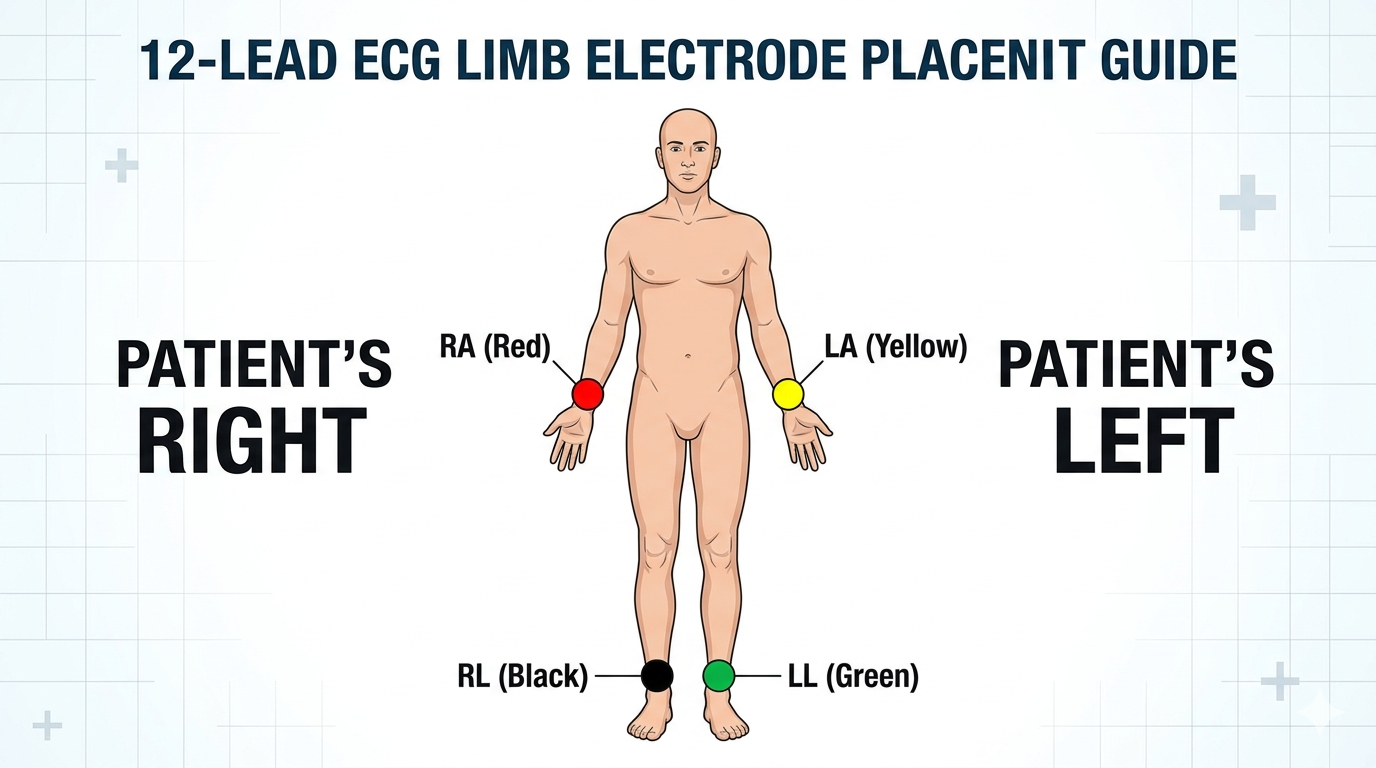
Figure 1: Anatomical Electrode Placement for Standard 12-Lead ECG
Figure 1: Anatomical Electrode Placement for Standard 12-Lead ECG
Image Placement: You can upload your medical illustration showing the precise anatomical landmarks and color-coded electrode positions on the human body right here. Caption suggestion: “Figure 1: Anatomical Electrode Placement for Standard 12-Lead ECG.”
4. Step-by-Step ECG Acquisition Procedure
- Hand Hygiene: Perform hand hygiene according to WHO standards and don clean gloves before patient contact.
- Positioning: Place the patient in a supine position. Ensure that the patient’s limbs do not touch the metal rails of the bed to prevent alternating current (AC) interference.
- Electrode Attachment: Place the electrodes on the identified anatomical landmarks and attach the lead wires without creating tension.
- Calibration Check: Verify that the ECG machine is set to standard calibration: Speed: 25 mm/sec, Amplitude/Gain: 10 mm/mV (1 mV = 10 mm).
- Recording: Instruct the patient to remain completely still, refrain from talking, and breathe normally during the 10-second recording phase. Press the print/record button.
- Post-Procedure: Gently remove the electrodes to avoid skin tears, and clean any residual conductive gel. Immediately label the ECG printout with the patient’s name, date of birth, date/time of acquisition, and clinical status (e.g., presence of chest pain).
5. NANDA-I Nursing Diagnoses & Interventions (NIC)
ECG acquisition is not merely a technical task, but an integral part of holistic nursing care. The following NANDA-I diagnoses and NIC interventions are critical during this procedure:
”Integrating nursing diagnoses while performing how to take a 12-lead ecg elevates the quality of patient care.”
Diagnosis 1: Anxiety [Domain 9, Coping/Stress Tolerance]
Defining Characteristics: Patient verbalizing fear of the procedure, increased heart rate (tachycardia), or agitation.
Nursing Interventions (NIC):
- Anxiety Reduction: Clearly explain that the procedure is completely painless, non-invasive, and carries no risk of electrical shock.
- Calm Approach: Maintain a reassuring, professional presence to lower the patient’s stress level.
Diagnosis 2: Risk for Decreased Cardiac Output [Domain 4, Activity/Rest]
Risk Factors: Suspected myocardial ischemia, life-threatening dysrhythmias, or electrolyte imbalances.
Nursing Interventions (NIC):
- Cardiac Care: Simultaneously monitor the patient’s vital signs (specifically SpO2 and Blood Pressure) during the procedure.
- Dysrhythmia Management: Analyze the ECG tracing immediately for lethal rhythms (e.g., VF, VT, Asystole, or ST-segment elevation) and ensure rapid notification of critical findings to the physician (Time is muscle).
6. Critical Warnings & Clinical Pearls
To prevent clinical errors and optimize patient outcomes, healthcare professionals must adhere to the following directives:
⚠ CRITICAL CLINICAL WARNINGS:
- Suspected Myocardial Infarction (MI) and Time Management: For any patient presenting to the emergency department or clinic with chest pain, a 12-lead ECG must be acquired and interpreted within 10 minutes of First Medical Contact (FMC). Early identification minimizes myocardial damage.
- Artifact Management: If the tracing shows erratic deflections or a jagged baseline, check for patient shivering (somatic tremor), proximity of mobile devices (electromagnetic interference), or loose/tangled lead wires before restarting.
- Dextrocardia Adaptation: In patients with known dextrocardia (heart located on the right side), precordial electrodes (V1-V6) must be placed in a mirror-image configuration on the right side of the chest (Right-sided ECG).
- Breast Tissue and V4-V6 Placement: Especially in female patients or individuals with gynecomastia, never place electrodes directly on top of breast tissue. Breast tissue must be displaced upward, and electrodes should be adhered directly to the underlying intercostal space. Incorrect placement alters the electrical axis and leads to false ST-segment readings.
- Pediatric ECG Variations: Due to right ventricular dominance in the pediatric population, an additional V4R lead (right 5th intercostal space, midclavicular line) may be required. Ensure that electrode sizes are appropriate for the child’s age and chest surface area.
⚠
For official international clinical guidelines, you can review the standard WHO standards. To explore more clinical nursing resources, visit our homepage at nursingcarehub.com.
Medical Disclaimer:
The information provided on this website and within this article is intended strictly for
educational and informational purposes for nursing students, healthcare professionals, and general readers. It does not constitute direct medical advice, diagnosis, or treatment recommendations. In real-world clinical practice, every patient’s status is unique. Healthcare professionals must always adhere to their specific institution’s localized protocols, attending physician orders, and the latest international clinical guidelines. The author and the platform assume no legal or clinical liability for actions taken based on the contents of this guide.